Install Tensorflow on Windows for Deep Learning
Got a gamer PC lying around? Why not install TensorFlow to turn it into a deep learning workstation? This simple recipe will get you ready in ten minutes.

About this tutorial
After a short introduction to deep learning, you will learn how to:
- install Tensorflow (the deep learning library from Google) on Windows
- run a very simple deep learning test
You will need:
- a PC with Windows 10 . If you have Windows 7, this tutorial will probably work, but I haven’t tested it. If you do, please let us know in the comments!
- a n NVidia graphics card in your PC . I have an NVidia GeForce GTX 970, which is fairly old. If you want to buy a card, you could crab a GeForce GTX 1050 Ti for 200 bucks. The tutorial will not work with a graphics card from another brand.
What’s deep learning?
In my tutorial about handwritten digits recognition with scikit-learn , we have seen that a simple neural network with a bunch of neurons on a single hidden layer can be trained to be reasonably good at classifying handwritten digits into ten categories.
But what if the pictures get more complex? And if we need to classify the pictures in hundreds or thousands of categories?
In fact, state of the art machine learning is nowadays very often based on deep learning. In deep learning, what’s deep is the neural network, which often features of the order of ten layers, with thousands of neurons in each layer.
Training deep neural nets only became possible in the past ten years, when people realized that the training could be done very efficiently on GPUs (Graphical Processing Units). Moreover, since the development of GPUs had been driven for years by the gaming industry to build computer graphics cards for gamers, the hardware was already widely available.
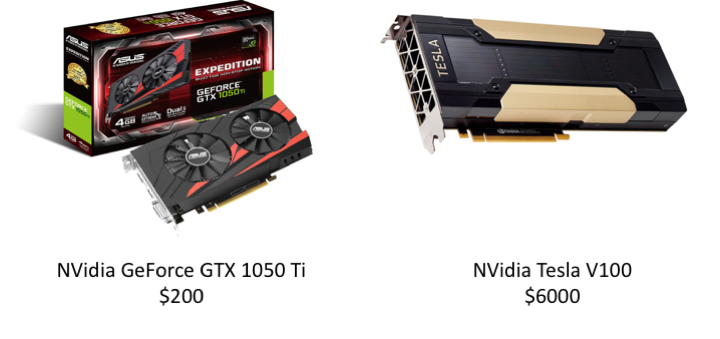
Nowadays, we can do deep learning on consumer graphics cards such as the GeForce GTX 1050 Ti at about \$200. Or if you’ve got some more bucks to throw at it, on dedicated GPUs for deep learning like the NVidia Tesla V100, at \$6000.
In a seminal article from 2012 cited more than 33 000 times, Alex Krizhevsky et al show that a convolutional deep neural net with 500 000 neurons is able to classify images with impressive performance in 1000 categories:
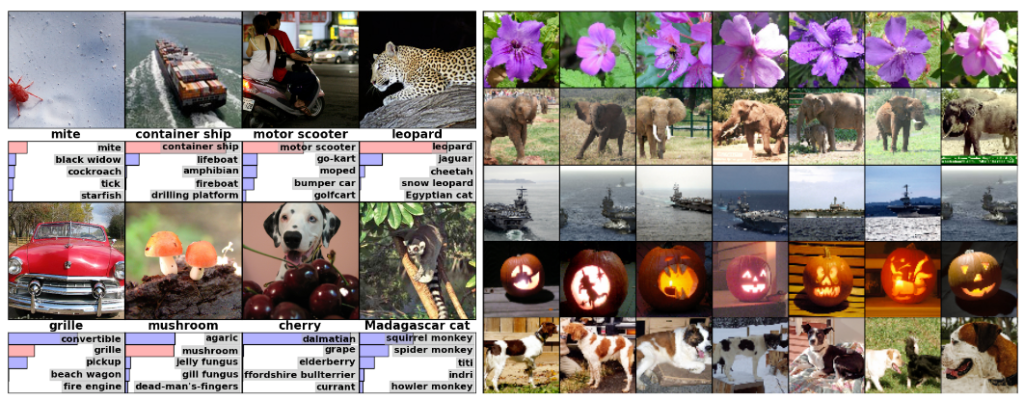
(Left) Eight test images and the five labels considered most probable by the neural net. The correct label is written under each image, and the probability assigned to the correct label is also shown with a red bar (it it happens to be in the top 5). (Right) Five test images in the first column. The remaining columns show the six training images that are considered to be similar by the neural net.
Can we try and setup deep neural nets ourselves?
Yes! but for that we need a graphics card and a way to use it to do machine learning.
Step 1 : Prerequisites
Please be sure that you have everything you need:
- a PC with Windows 10. If you have Windows 7, this tutorial will probably work, but I haven’t tested it.
- an NVidia graphics card in your PC.
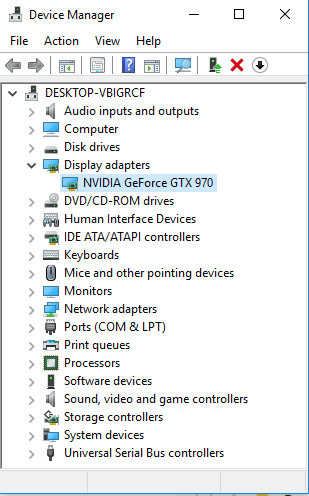
If you don’t know what’s your graphics card, we're going to check. Click the windows start button, and type ‘device manager’. Run it. Then, click on display adapters and look at the name of your card:
Then, check that this GPU is indeed
supported by NVidia
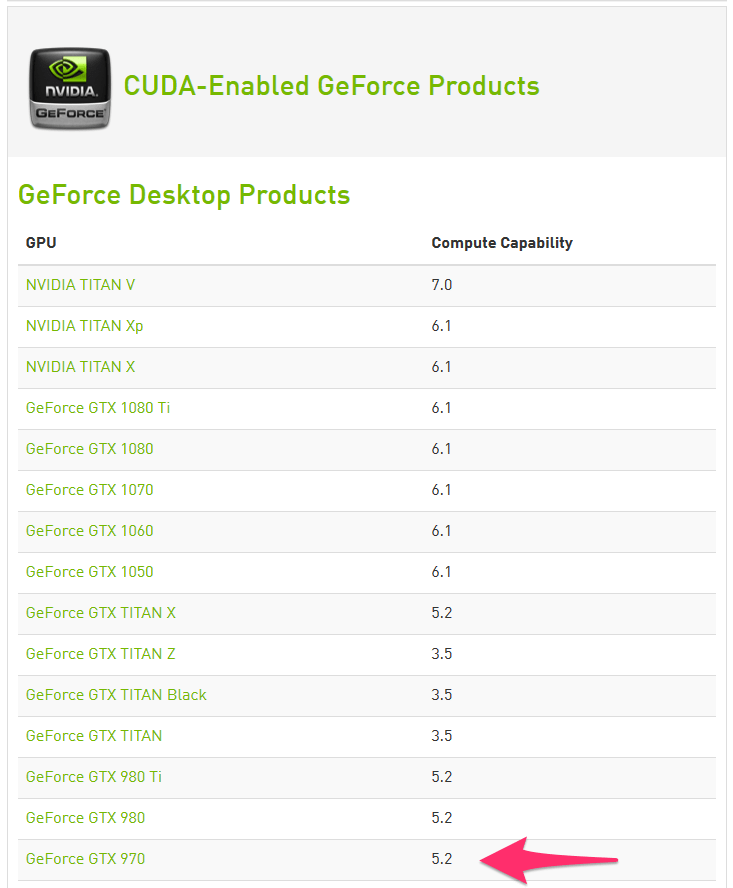
Actually, my old GeForce 970 is not going to be too bad compared to the Tesla V100 monster, which has a compute capability of 7.0!
However, a crucial point is the amount of RAM available on the card, 16 GB for the V100 and only 4 GB on the GeForce 970. The more complex your network, the more RAM you need.
Step 2 : Drivers
Your computer cannot do anything with your nice graphics card unless it can talk to it. That’s what drivers are for.
So please download the latest drivers for your card.
For this tutorial, I’m using the NVidia driver version 397.93, and you need at least 384.X
Step 3 : Software
To do deep learning on your card, you will need the following software (don’t install them, I have an easier solution for you below):
- CUDA : parallel computing architecture from NVidia. CUDA will make it possible for you to use the many computing cores of your GPU for mathematical calculations.
- cuDNN : specific library for deep neural networks with CUDA.
- TensorFlow : Google’s deep learning library
- Keras : Nice python interface to tensorflow
Installing CUDA and cuDNN manually is not easy.
Fortunately, Anaconda comes again to our help. It will help us install all the needed software in one go.
Let’s do it now.
If you have followed my tutorial on handwritten digits Anaconda is already installed on your system.
If not, download anaconda for your system:
- Choose the version for python 2.X or 3.X.
- If you're using windows or linux, make sure to pick the 64bit installer if you have a 64bit system.
Run the installer.
Then, run the Anaconda Prompt application.
In the prompt, create a new anaconda environment:
conda create --name tf_gpu tensorflow-gpu
Activate this environment:
conda activate tf_gpu
And install a few additional packages that will be needed later:
conda install jupyter matplotlib scikit-learn
Step 5: Test!
We now have everything we need.
Launch Anaconda Navigator, and go to the Environments tab. You should see your tf_gpu environment there. Select it.
Click on the arrow on the right side of the environment name, and select "Open with IPython."
In the IPython prompt, type:
import tensorflow as tf
sess = tf.Session(config=tf.ConfigProto(log_device_placement=True))
If everything's ok you should get a message similar to this one (and if not please tell me in the comments, I'll help you):
2019-01-25 09:59:36.191801: I tensorflow/core/platform/cpu_feature_guard.cc:141] Your CPU supports instructions that this TensorFlow binary was not compiled to use: AVX AVX2
2019-01-25 09:59:36.395983: I tensorflow/core/common_runtime/gpu/gpu_device.cc:1432] Found device 0 with properties:
name: GeForce GTX 970 major: 5 minor: 2 memoryClockRate(GHz): 1.253
pciBusID: 0000:01:00.0
totalMemory: 4.00GiB freeMemory: 3.30GiB
2019-01-25 09:59:36.402795: I tensorflow/core/common_runtime/gpu/gpu_device.cc:1511] Adding visible gpu devices: 0
2019-01-25 09:59:37.896065: I tensorflow/core/common_runtime/gpu/gpu_device.cc:982] Device interconnect StreamExecutor with strength 1 edge matrix:
2019-01-25 09:59:37.899787: I tensorflow/core/common_runtime/gpu/gpu_device.cc:988]      0
2019-01-25 09:59:37.901547: I tensorflow/core/common_runtime/gpu/gpu_device.cc:1001] 0:   N
2019-01-25 09:59:37.905082: I tensorflow/core/common_runtime/gpu/gpu_device.cc:1115] Created TensorFlow device (/job:localhost/replica:0/task:0/device:GPU:0 with 3009 MB memory) -> physical GPU (device: 0, name: GeForce GTX 970, pci bus id: 0000:01:00.0, compute capability: 5.2)
Device mapping:
/job:localhost/replica:0/task:0/device:GPU:0 -> device: 0, name: GeForce GTX 970, pci bus id: 0000:01:00.0, compute capability: 5.2
2019-01-25 09:59:37.913059: I tensorflow/core/common_runtime/direct_session.cc:307] Device mapping:
/job:localhost/replica:0/task:0/device:GPU:0 -> device: 0, name: GeForce GTX 970, pci bus id: 0000:01:00.0, compute capability: 5.2
What's next?
In this post, you have learnt how to install TensorFlow on your gamer PC with the help of Anaconda.
Next time, we'll see how to use it to do deep learning.
Please let me know what you think in the comments! I’ll try and answer all questions.
And if you liked this article, you can subscribe to my mailing list to be notified of new posts (no more than one mail per week I promise.)
Learn about Data Science and Machine Learning!
You can join my mailing list for new posts and exclusive content: