Fast Minimal Install of a Raspberry Pi
Set up a raspberry pi with the software you need and nothing else in less than 10 minutes!
About this post
Today, you'll learn how to set up a raspberry pi with the software you need and nothing else in less than 10 minutes!
It is extremely easy for new users to install raspbian on a raspberry pi with NOOBS . So easy that this method is advertized almost everywhere. If you've never used a raspberry pi before, maybe you want to give it a try.
That being said, I never use this method because
- it takes more time;
- you end up with software that you don't need, e.g. LibreOffice, Mathematica, and even more useless stuff. No offence, but I'd never use a raspberry pi to run such applications, rather a proper laptop or desktop.
If you're like me, you instead want to dedicate your raspberry pi for a few specific tasks. For instance, I currently have four raspberry pis online:
- The first pi is running a samba server. It is connected to an SSD disk, and behaves as a low power NAS.
-
The second pi is running three home automation servers:
- homeassistant : main home automation server
- mosquitto : an mqtt broker that allows all my computers and IOT devices to communicate
- nodered : handles all automations and notifications
- The third pi is being set up. It will be installed in the electrical panel of the house to monitor power consumption.
- The fourth pi is for tests. That is the one I will use today.
So let's get started!
What you need
Since we want a lightweight system, we won't have a window manager and we will work with the linux command line.
You need:
- a raspberry pi obviously, more on that just below.
-
for the initial setup:
- a computer screen or a TV with an HDMI input.
- a keyboard
- a micro SD card reader
-
another computer. It will be used to:
- download the raspberry pi operating system image, and burn it to the pi SD card.
- connect remotely to the pi with ssh to use it after the initial setup
I will assume that your other computer is a mac. If you have a windows PC or Linux, I will also suggest solutions for you.
Which kind of pi?
So which raspberry pi should you get? I've got a few advices for you (today is the 27th of April, 2019).
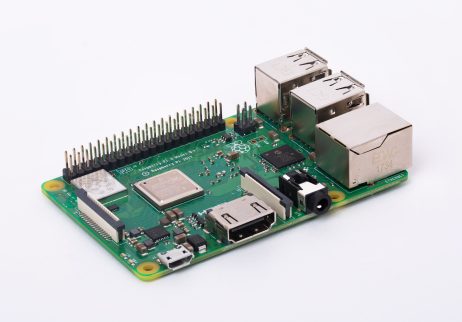
If you don't know what kind of pi to get, just buy a raspberry pi 3 B+ .
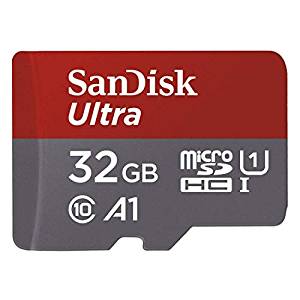
The pi uses a micro SD card as a disk. The speed of the SD card is extremely important for two reasons. First, it will determine how responsive is your system. Second, speedy SD cards have a smaller chance to get corrupted (in which case you would be forced to reinstall your pi).
However, the capacity of the card is not so much of an issue: 32 GB is more than enough.
So buy a small, fast, high-end card. I currently use SanDisk micro SD HC U1 (class 10, A1), 32 GB, that are currently sold for 8 euros on amazon.
Then, you need a USB power supply . Some people say that the official raspberry pi power supply is more stable, and these are the ones I use. But I have also powered pis with phone chargers without problems, so up to you. Just make sure to use a power supply that can output 2.5 A.
Finally, you probably want to use a case . I use the official case , and sometimes no case at all.
You can also purchase a full kit containing the pi, the SD card, the power supply, and the case. But in my experience, the SD card provided in such kits is often slow. I once had SD card corruption because of a power cut, and I did not have a back up at the time (yeah I know). So now I use very good cards, and I have a backup.
Now that we have everything we need, let's get going with the installation!
Flash Rasbian Lite to the SD card
Raspbian is the recommended operating system for the raspberry pi. It's a Debian Linux like Ubuntu, so if you're already using Ubuntu, you'll feel at home.
Since we want a minimal install, we will use Raspbian Lite. That's just Raspbian, but without any optional package. You can always add the ones you need later easily.
Download the latest image of Raspbian Lite here . The current version of Raspbian is Raspian Stretch. Unpack the archive.
The archive contains an image file (.img) that we want to burn to our SD card. Put the micro SD card in the micro SD card reader and connect the reader to your other computer via USB.
The easiest way to burn the image to the SD card is to use Etcher , which works on mac OS, Windows, and Linux. However, I usually use a more manual method based on dd, which is explained in the next two sections. If you use Etcher, you can skip them.
Identify the SD card (mac OS instructions)
On the mac, open a terminal and do:
diskutil list
/dev/disk0 (internal):
   #:                       TYPE NAME                    SIZE       IDENTIFIER
   0:      GUID_partition_scheme                         500.3 GB   disk0
   1:                        EFI EFI                     314.6 MB   disk0s1
   2:                 Apple_APFS Container disk1         500.0 GB   disk0s2

/dev/disk1 (synthesized):
   #:                       TYPE NAME                    SIZE       IDENTIFIER
   0:      APFS Container Scheme -                      +500.0 GB   disk1
                                 Physical Store disk0s2
   1:                APFS Volume Macintosh HD            336.3 GB   disk1s1
   2:                APFS Volume Preboot                 23.9 MB    disk1s2
   3:                APFS Volume Recovery                515.0 MB   disk1s3
   4:                APFS Volume VM                      5.4 GB     disk1s4

/dev/disk2 (external, physical):
   #:                       TYPE NAME                    SIZE       IDENTIFIER
   0:     FDisk_partition_scheme                        *31.9 GB    disk2
   1:             Windows_FAT_32 NO NAME                 31.9 GB    disk2s1
I'm using a 32 GB SD card, so it's obvious that the card is /dev/disk2 while the mac's main disk is /dev/disk1.
Take good note of this, and do not mess up! Or you might make your computer unusable by overwriting its main disk in what follows.
Burn the image (mac OS instructions)
Unmount the SD card (just in case it's mounted)
diskutil unmountDisk /dev/disk2
In the command below, make sure that the path to the input image file is correct, and DO CHECK THAT THE DESTINATION DISK IS THE SD CARD AND NOT THE MAIN DISK . I won't bare any responsibility if you mess up here ;-) If you're sure, run this command to write the image to the SD card:
sudo dd bs=1m if=2019-04-08-raspbian-stretch-lite.img of=/dev/disk2 conv=sync
It will take some time to complete, and there is no progress bar, so just be patient.
After the command completes, unmount the SD card:
diskutil unmountDisk /dev/disk2
And insert it in your raspberry pi. Connect the screen and the keyboard to the pi, and connect the power supply to fire up the pi.
Initial set up
The boot is fast, and you are presented with a login prompt. Log in with the default username / password: pi / raspberry.
We will configure the machine with raspi-config:
sudo raspi-config
In Localisation Options:
- Choose the keyboard layout matching your keyboard (default is US)
- Change the timezone
Go back and go to Network Options:
- Change the Hostname. By default it's raspberry. That might be fine, but as soon as you get another pi, you'll have to change it. So give it a unique name now. In the following I will assume that you use rasptest
- Set up the Wi-fi connection
Go back and change the User password.
Finally, go to Interfacing Options, and enable remote command line access to your Pi using SSH.
Select Finish, and reboot the pi:
sudo reboot
Make sure that the settings are correct with the following commands.
To check the host name:
hostname
Then, you can also check the date and time:
date
now, check that you can connect to the internet:
ping www.google.com
And finally that you can connect to the pi via SSH:
ssh pi@localhost
We're done with the initial setup! you can now get rid of the screen and the keyboard. From now on, we will work remotely through ssh. You can now power down your pi, and plug it somewhere else if you wish:
sudo poweroff
Final configuration
Ok, now we have a really minimal system. We're going to use our laptop or desktop to finalize its configuration. First login to the pi with ssh. On windows, you can do that with PuTTY . On MacOS or Linux, do:
ssh -X pi@rasptest
Upgrade the system:
sudo apt update
sudo apt upgrade
That's nice, we have a terminal on the pi and everything can be done from there. But we cannot open any other window. For this, we need to install X11. That's not really needed, but it's more comfortable, so I usually install it. Also, I like to use emacs as a text editor, and I definitely need git all the time. Let's install all of this now:
sudo apt install xterm emacs git dbus-x11
After this, you can open another terminal by doing:
xterm &
This launches the terminal and puts it in background so that you can use both terminals. Please note that this works because we have enabled X11 forwarding with the -X option when we logged in to the pi with ssh.
And now?
Well done!
You're now ready to install the software you need on your pi e.g. homeassistant, opencv, anything.
I'm planning several tutorials based on the raspberry pi soon. For example, I will try to do real-time human detection on a pi.
Finally, even though this blog is primarily about machine learning and data science, I'm very much into IOT and microcontrollers too. So I'd like to show you a few things like how to:
- install and configure home assistant
- use mqtt for IOT communication
- set up and use ESP8266 wifi boards as IOT devices, with micropython
- set up and use a raspberry pi zero w
- ...
So stay tuned! And if you like this new twist to this blog (or not), let me know.
Please let me know what you think in the comments! I’ll try and answer all questions.
And if you liked this article, you can subscribe to my mailing list to be notified of new posts (no more than one mail per week I promise.)
Learn about Data Science and Machine Learning!
You can join my mailing list for new posts and exclusive content: